How to provide better attribution for your RUM metrics

Here's a detailed walkthrough showing how to make more meaningful and intuitive attributions for your RUM metrics – which makes it much easier for you to zero in on your performance issues.
Real user monitoring (RUM) has always been incredibly important for any organization focused on performance. RUM – also known as field testing – captures performance metrics as real users browse your website and helps you understand how actual users experience your site. But it’s only in the last few years that RUM data has started to become more actionable, allowing you to diagnose what is making your pages slower or less usable for your visitors.
Making newer RUM metrics – such as Core Web Vitals – more actionable has been a significant priority for standards bodies. A big part of this shift has been better attribution, so we can tell what's actually going on when RUM metrics change.
Core Web Vitals metrics – like Largest Contentful Paint (LCP), Interaction to Next Paint (INP), and Cumulative Layout Shift (CLS) – all have some level of attribution associated with them, which helps you identify what exactly is triggering the metric. The LoAF API is all about attribution, helping you zero in on which scripts are causing issues.
Having this attribution available, particularly when paired with meaningful subparts, can help us to quickly identify which specific components we should prioritize in our optimization work.
We can help make this attribution even more valuable by ensuring that key components in our page have meaningful, semantic attributes attached to them.
How the browser handles attribution
When a metric that has some level of attribution associated with it – like LCP or INP – is triggered, the browser provides us with the element that triggered the measurement.
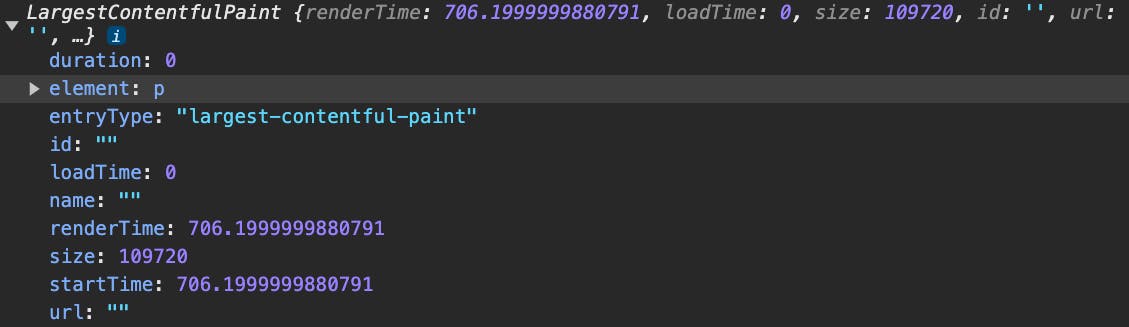
For the Largest Contentful Paint (LCP) metric, for example, attribution is provided in the element property.
For Interaction to Next Paint (INP), attribution comes in the form of the target property:
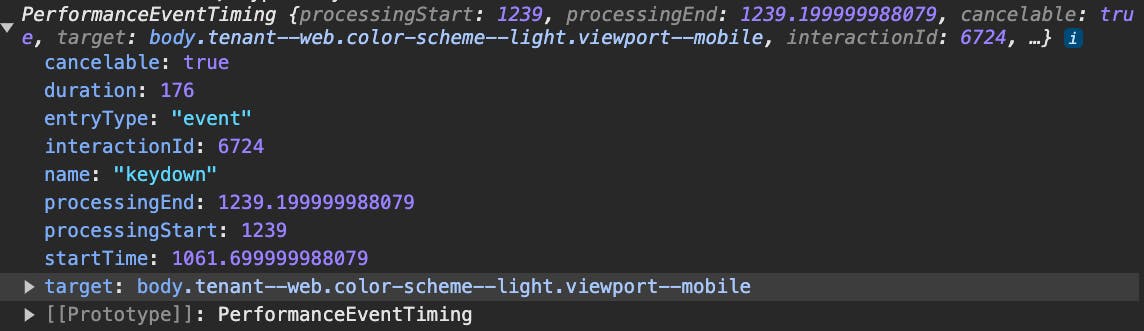
In either case, the browser will provide us with a selector for that specific element containing any class or ID attributes that may be applied.
Consider the following three links:
.png?auto=format,compress&fit=max&w=2000)
If the first link is clicked and triggers an INP, we will get a target of a.btn-primary. For the second link, the browser will return a#myLink. For the third, since there are no classes or IDs to provide, the browser will simply provide us with a target of a .
Already, there’s a meaningful difference in what we see for attribution. Since IDs are required to be unique on a page, we can quickly grab the #myLink attribute and figure out which element is responsible.
The other two targets are not as clear. There could be any number of links on our page triggering the a target, and classes are not required to be unique, so we could be staring at a bunch of a.btn-primary's in our page as well.
At this point, many RUM providers (like SpeedCurve) will try to help you out by walking back up the elements in your page to provide you with a more complete and specific path to the target element.
To do this, they will start by fetching the parent element of the target element, and record both the type of element and any classes or IDs associated with it.
For example, consider the following markup:
.png?auto=format,compress&fit=max&w=2000)
The browser will provide us with a target of a.classButton, but many RUM providers (ourselves included), will walk up the DOM and provide you with an element selector of:
div.main>div.large>p.center>a.classButton
The goal is to provide you with as unique a path as possible to help you pinpoint exactly which element on your page is involved.
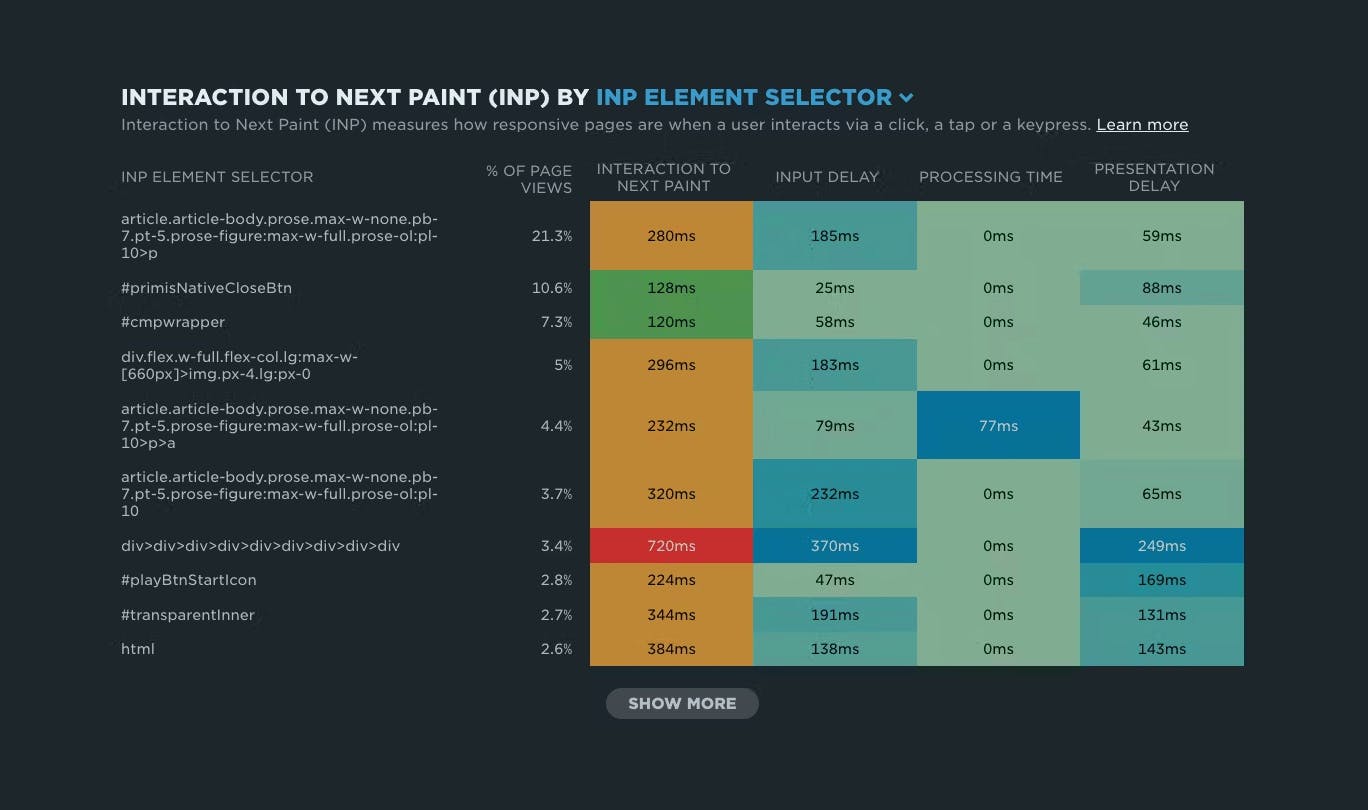
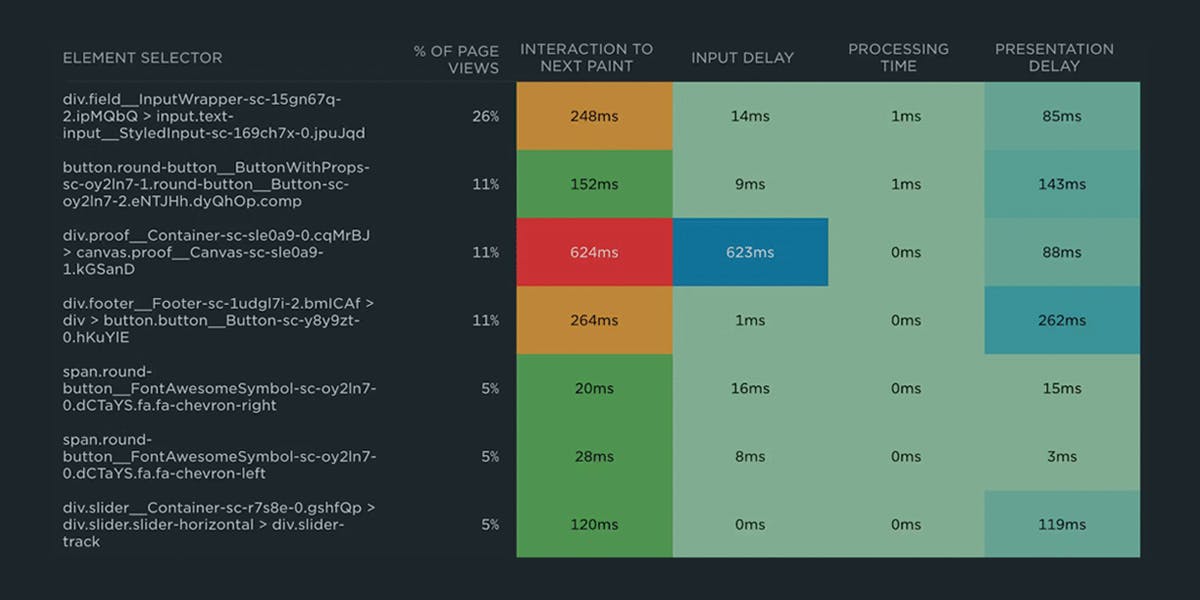
In SpeedCurve, that attribution is provided for both LCP and INP so you can quickly identify exactly what components are impacting your performance. Here’s an example heatmap from SpeedCurve showing this selector in action:
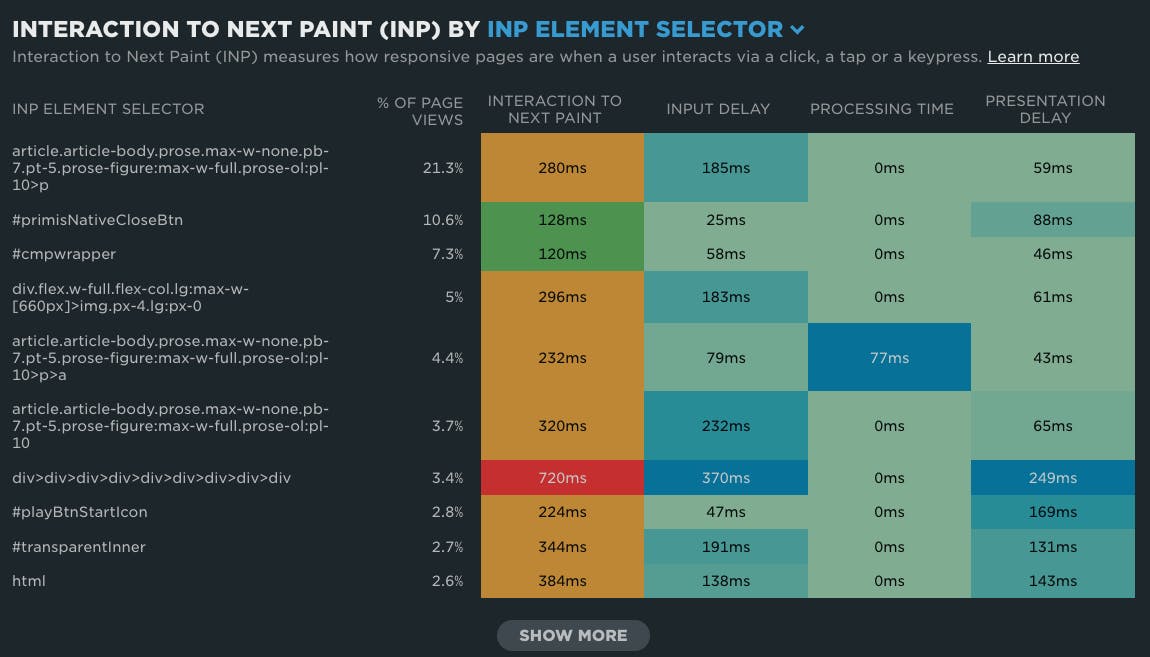
Some of these selectors (#playBtnStartIcon, #cmpWrapper , etc) are fairly intuitive. But notice the complex path to some of the other INP triggers.
For example, we could probably figure this out, but it’s going to take us hopping into the source of the page to drill into what element exactly is triggering this one:
article.article-body.prose.max-w-none.pb-7.pt-5.prose-figure:max-w-full.prose-ol:pl-10>p>a
In this case, the browser wasn’t even able to find a class name so we just get a series of div selectors that is going to be tricky to hunt down:
div>div>div>div>div>div>div>div>div
Contrast that with the attribution for the play button (#playBtnStartIcon). This selector is immediately intuitive (and short!) because we had a meaningful ID on the element itself, so there was no need to walk up the DOM and get a long list of selectors.
Making attribution meaningful
We can make it much easier for ourselves to quickly identify what elements are involved by ensuring that key components on our page have meaningful flags for attribution.
With SpeedCurve, there are two ways of accomplishing this:
- providing a relevant `id` attribute
- using the `data-sctrack` attribute
Using a relevant `id` attribute
One option we have is to provide an id attribute on our key components. While SpeedCurve is working to provide you with a meaningful selector, as soon as an element with an id is discovered, we will stop walking up the DOM. The id attributed is required to be unique, so we’re able to provide just that.
You’ve already seen an example of this where the target element itself had an ID directly applied to it, but this also works for shortening the selector in general.
Let’s revisit our markup from earlier, but this time we’ll add an ID to our entry paragraph:
.png?auto=format,compress&fit=max&w=2000)
The browser will still provide a target of a.classButton, but now SpeedCurve will walk up the DOM, see the unique ID and provide a much more intuitive element selector of #heroParagraph>a.classButton .
Using the `data-sctrack` attribute
In SpeedCurve, we provide you with an alternative approach to attribution, in case you would rather not sprinkle a bunch of ID’s throughout your markup.
Our RUM script will also look for the data-sctrack attribute while trying to generate our element selector.
There’s one important difference here between how data-sctrack and id are used. In the case of id, we treat that attribute as part of a selector path. If we find a data-sctrack attribute, however, we will simply provide the value of that attribute—not a full selector path.
For example, in the previous markup, the element selector provided was #heroParagraph>a.classButton. If, however, we adjusted our markup to use a data-sctrack attribute like so:
.png?auto=format,compress&fit=max&w=2000)
The element selector we would provide would be heroParagraph , not the full path to the link itself.
Neither approach is necessarily inherently better than the other. It comes down to your specific approach to markup, and the components you’re using.
In either case, however, providing unique id ’s or data-sctrack attributes on your page will result in much more meaningful and intuitive attribution, making it much easier for you to zero in on your performance issues.

Read Next
Now it's even easier to find and fix Interaction to Next Paint issues and improve your Core Web Vitals.

What is INP? How does it correlate with user behaviour, such as bounce and conversion rates? And how can you improve it?